
Google Maps is a very famous and helpful service, which firmly entrenched in our lives. With the Google Maps Android API you can add maps based on Google Maps data to your application. The API automatically handles access to Google Maps servers, data downloading, map display, and response to map gestures. You can also use API calls to add markers, polygons, and overlays to a basic map, and to change the user's view of a particular map area.
In this article we’re going to show you how to work with Google Maps Android API.
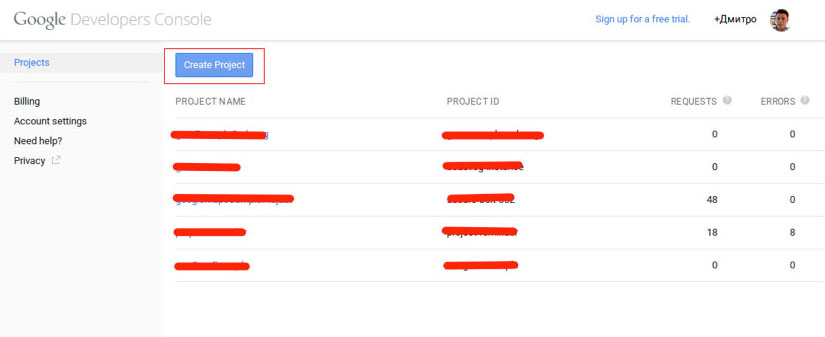
1. Create project on Google Developers Console.
For this, press “Create Project” button and fill the required fields in an appeared dialog box.
Pic. 1. Google Developers Console
2. Open this project and go to APIs & auth → APIs. Enable Google Maps Android API v2 there.

Pic. 2. Google Maps Android API v2 Enabling
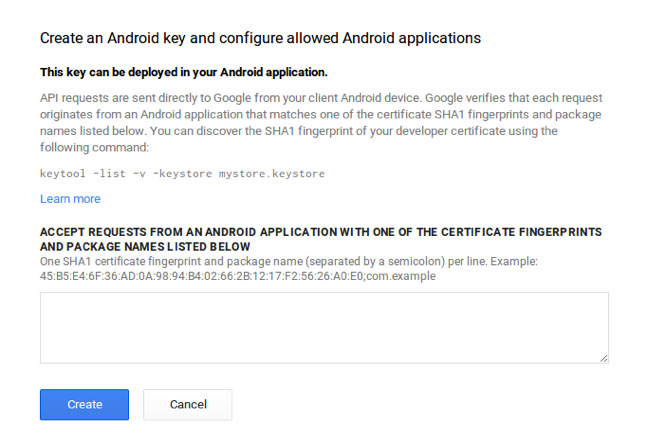
3. Generate API KEY for your application. Go to APIs & auth → Credentials.
For this, press “Create new Key” button. In an appeared window add SHA1 certificate fingerprint and package name separated by semicolon (see Pic. 3).
Pic. 3. Create an Android Key
How to get SHA1 you can see here: https://www.youtube.com/watch?v=cWDM0lZl_C0
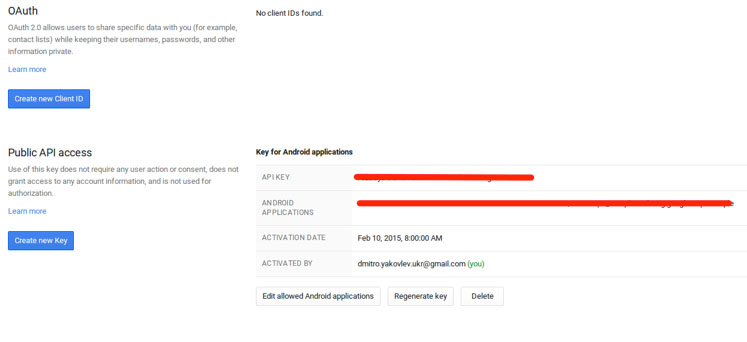
After the successful API KEY generation “Key for Android applications” table will appear (see Pic. 4).
Pic. 4. Generated API KEY.
4. Set up Google Play services SDK.
To develop an app using the Google Play services APIs, you need to set up your project with the Google Play services SDK.
In AndroidStudio :
4.1. Open the build.gradle file inside your application module directory.
4.2. Add a new build rule under dependencies for the latest version of play-services.
For example:
dependencies {
    compile 'com.google.android.gms:play-services:6.5.87'
}
4.3. Save the changes and click Sync Project with Gradle Files in the toolbar.
5. Change AndroidManifest file to work with maps.
5.1. Uses permissions.
<uses-permission android:name="com.javapapers.android.maps.path.permission.MAPS_RECEIVE" />
<uses-permissionandroid:name="android.permission.INTERNET"></uses-permission>
<uses-permissionandroid:name="android.permission.ACCESS_NETWORK_STATE"></uses-permission>
<uses-permissionandroid:name="android.permission.WRITE_EXTERNAL_STORAGE"></uses-permission>
<uses-permissionandroid:name="com.google.android.providers.gsf.permission.READ_GSERVICES"></uses-permission>
<uses-permissionandroid:name="android.permission.ACCESS_COARSE_LOCATION"></uses-permission>
<uses-permissionandroid:name="android.permission.ACCESS_FINE_LOCATION"></uses-permission>
5.2. Permission.
<permission
android:name="com.codevog.google_maps_sample.permission.MAPS_RECEIVE"
android:protectionLevel="signature"/>
5.3. Uses-feature.
<uses-feature
android:glEsVersion="0x00020000"
android:required="true"></uses-feature>
5.4. Meta-data (add to tag application)
<meta-data
android:name="com.google.android.maps.v2.API_KEY"
android:value="AIzaSyDOdK8mek8KmFnlSnvb2D0wCgm0c6aE5JI">
</meta-data>
6. Initialize GoogleMap view.
6.1. For using GoogleMap view add the following fragment to the layout file:
<fragment
android:id="@+id/mapView"
android:name="com.google.android.gms.maps.SupportMapFragment"
android:layout_width="match_parent"
android:layout_height="match_parent">
</fragment>
6.2. Add the following code to your Activity or Fragment implementation:
SupportMapFragment  mapFragment = (SupportMapFragment)
getActivity().getSupportFragmentManager().findFragmentById(R.id.mapView);
GoogleMap map = mapFragment.getMap();
Now, you can work with GoogleMap in your project.
7. GoogleMap UiSettings changing.
You can change UiSettings for GoogleMap. Code snippet below shows how to do this.
map.setMyLocationEnabled(true);
UiSettings uiSettings = map.getUiSettings();
uiSettings.setAllGesturesEnabled(true);
uiSettings.setMyLocationButtonEnabled(true);
uiSettings.setCompassEnabled(true);
uiSettings.setRotateGesturesEnabled(true);
uiSettings.setScrollGesturesEnabled(true);
uiSettings.setTiltGesturesEnabled(true);
uiSettings.setZoomControlsEnabled(true);
uiSettings.setZoomGesturesEnabled(true);
8. Google Map type.
GoogleMap provides several map types. We demonstrated all of them in our sample project.
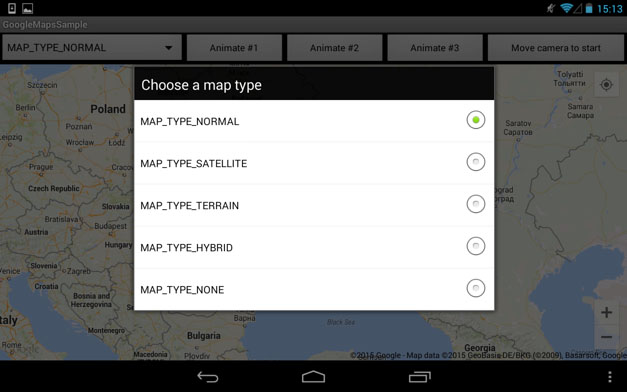
Pic. 5. Select map types dialog
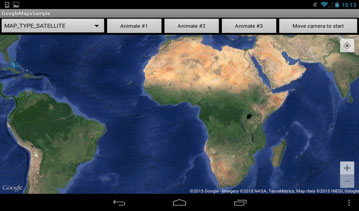
Pic. 6. Satellite map type

Pic. 7. Hybrid map type
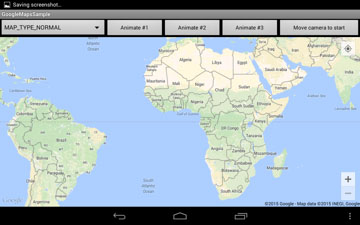
Pic. 8. Normal map type

Pic. 9. Terrain map type
You can set map type for GoogleMap quite easily. See next code snippet:
map.setMapType(GoogleMap.MAP_TYPE_NORMAL);9. Changing a Map's View.
Google Maps API provides different ways to change map view. One of them is to change camera position using the next properties:
As well, you can apply camera moving using change zoom functionality and change camera position. Moreover, you are allowed to animate and move a camera using appropriated methods. In code snippet below we demonstrate how you can animate camera toward Ukraine.
CameraPosition cameraPosition = new CameraPosition.Builder()
.target(new LatLng(49.549994, 31.237567))
.zoom(6)
.bearing(15)
.tilt(10)
.build();
CameraUpdate cameraUpdate = CameraUpdateFactory.newCameraPosition(cameraPosition);
map.animateCamera(cameraUpdate);

Pic. 10. Results of camera animation (press button “Animate #1”)
We demonstrated three versions of using animateCamera() method and one implementation of moveCamera() method in our sample. You can test them in the sample project.
10. Markers on GoogleMap.
On Pic. 11 two markers with custom info window are shown.
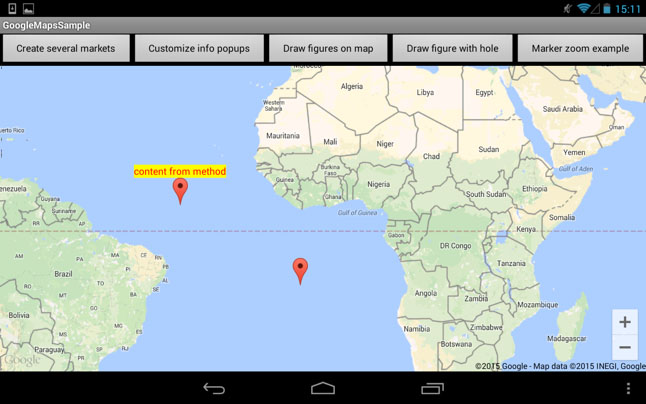
Pic. 11. Markers with custom info views
In our sample you can find several clear examples of markers using. Be aware, that Google Maps API provides the following interesting capabilities for markers:
11. Figures on GoogleMap.
Finally, we describe the figures drawn on GoogleMap. This is quite useful feature.
You can draw the following figures:
This code snippet shows all types of figures.
PolylineOptions polylineOptions = new PolylineOptions()
.add(new LatLng(-5.348589, -35.540407))
.add(new LatLng(12.548593, -16.520053))
.add(new LatLng(17.805633, -66.266149))
.add(new LatLng(10.135911, -61.520055))
.color(Color.BLACK).width(2);
map.addPolyline(polylineOptions);

PolygonOptions polygoneOptions = new PolygonOptions()
.add(new LatLng(-5, -10)).add(new LatLng(-5, 0))
.add(new LatLng(5, 0)).add(new LatLng(5, -10))
.strokeColor(Color.RED).strokeWidth(3).fillColor(Color.YELLOW);
map.addPolygon(polygoneOptions);

CircleOptions circleOptions = new CircleOptions()
.center(new LatLng(15, 15))
.radius(500000)
.fillColor(Color.RED)
.strokeColor(Color.BLACK)
.strokeWidth(3);
map.addCircle(circleOptions);
Pic. 12 demonstrates how these figures are displayed.
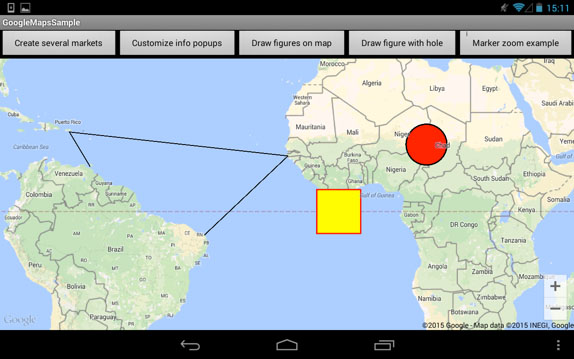
Pic. 12. Figures on Map
You can add a hole to figure as well. See the following code. Pic. 13 demonstrates the results of code execution.
List list = new ArrayList();
        list.add(new LatLng(-1.774548, 11.926396));
        list.add(new LatLng(2.947988, 10.904668));
        list.add(new LatLng(2.794372, 18.485235));
        list.add(new LatLng(-4.757636, 18.133672));

PolygonOptions polygoneOptions = new PolygonOptions()
         .add(new LatLng(8.585919, 25.543579))
         .add(new LatLng(11.700123, -3.899781))
         .add(new LatLng(-11.087305, -4.075563))
         .add(new LatLng(-12.635505, 25.807251))
         .addHole(list)
         .strokeColor(Color.BLACK).
         strokeWidth(1).
         fillColor(Color.RED);
         map.addPolygon(polygoneOptions);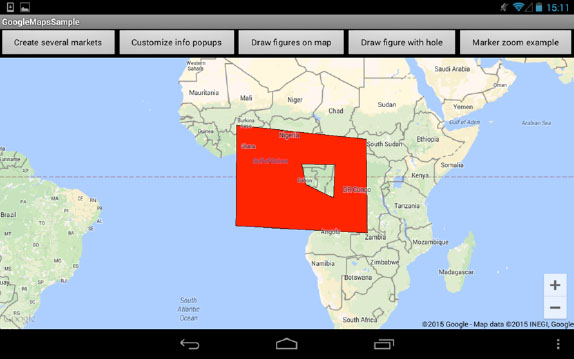
Pic. 13. Figure with a hole on GoogleMap
You can also add a ground overlay, an image that is fixed to a map. Ground overlays are useful when you wish to fix a single image at one area on the map. Code snippet below shows how to use it.
GroundOverlayOptions newarkMap = new GroundOverlayOptions()
                .image(BitmapDescriptorFactory.fromResource(R.drawable.ic_launcher))
                .position(new LatLng(14.768968, -61.520055), 500000f, 500000f);
        map.addGroundOverlay(newarkMap);

Pic. 14. GroundOverlayOptions before zoom
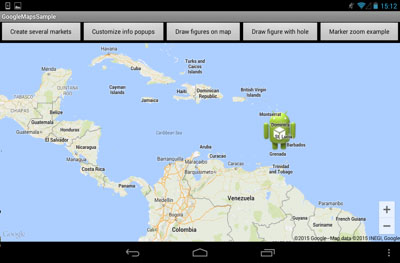
Pic. 15. GroundOverlayOptions after zoom
So, in this article we demonstrated how to start working with GoogleMaps and how you can do a lot of amazing thing. Our sample project is a very useful code snippets compilation, which describes the main basements and essentials of Android applications with maps usage. You can download sample here.
Categories
Tags
Favourite posts
Getting an e-Commerce website online might sound like a huge undertaking,...
WebView displays web pages. But we are interested not only in web-content...
Google Maps is a very famous and helpful service, which firmly entrenched...
RSpec is an integral part of Test Drive Development (TDD) and its main id...
When developing a web application that extensively works with user input ...
Field configuration defines behavior of all standart (system) fields and ...
As you might have already heard, the latest stuff for upgrading rails was...